Update WCC UI connection details using WLST commands.
OS Version : Windows 10
WCC Version : 12.2.1.3.0
1. Open command prompt and go to <MW_Home>\Oracle_Home\oracle_common\common\bin
eg: C:\cd C:\xxxxxxx\Middleware\Oracle_Home\oracle_common\common\bin
2. Set the WL_HOME environment variable
eg: set WL_HOME=<MW_Home>\Oracle_Home\wlserver
3. Execute 'wlst' command.
4. Connect WCC UI server instance using connect command.
eg: connect('weblogic','<Password>','t3://localhost:16225')
5. Execute listRIDCConnections to view RIDC connection information.
Eg: listRIDCConnections('Oracle WebCenter Content - Web UI')
6. Execute updateRIDCConnection to update RIDC connection details.
Eg: updateRIDCConnection('Oracle WebCenter Content - Web UI','WccAdfServerConnection',connUrl='idc://localhost:4444',credUsername='weblogic')
7. Execute exit command to exit from WLST mode
Eg: exit()
Try here to update WCC UI connection details from EM console.
Delete/Create OHS instance from WLS domain.
Deleting or creating OHS instance in weblogic domain is very easy. Follow below steps to delete/create OHS instance from/on OHS domain.
OHS Version: 12.2.3.0
Weblogic server version: 12.2.3.0
Delete OHS instance
1. Open EM console and click on your OHS domain. Then select OHS Instance sub menu from domain dropdown.

2. Get lock and edit session from EM console.
3.Select OHS instance and click on delete button .

Create OHS instance.
Prerequisites: Assuming OHS is installed on your domain.
1. From OHS instance page, click on create button.
2. Provide valid OHS instance name and select machine name.

3. Click on Ok button.
Start and stop OHS server instance using scripts.
OS: Windows 10
OHS version: 12.2.3.0
Start OHS instance
1. Open command prompt and go to 'bin' folder under domain home
cd <Domain Home>\bin
For eg: cd <MW_Home>\user_projects\domains\WC_domain\bin
2. Execute below comman.
startComponent <OHS instance name>
For eg: startComponent WC_OHS_1
3. Provide 'nodemanager' password.
Stop OHS instance
1. Open command prompt and go to 'bin' folder under domain home
cd <Domain Home>\bin
For eg: cd <MW_Home>\user_projects\domains\WC_domain\bin
2. Execute below comman.
stopComponent <OHS instance name>
For eg: startComponent WC_OHS_1
3. Provide 'nodemanager' password.
Change Node Manager port in Oracle WebLogic Server.
1. For a domain-based Node Manager, edit nodemanager.properties from below location
DOMAIN_HOME/nodemanager/nodemanager.properties
2. On the Machines page, select the machine.
3. Select the Configuration tab.
4. Select the Node Manager tab.
5. Change the Listen Port to the new port number.
6. Click Save and restart nodemanager.
DOMAIN_HOME/nodemanager/nodemanager.properties
2. On the Machines page, select the machine.
3. Select the Configuration tab.
4. Select the Node Manager tab.
5. Change the Listen Port to the new port number.
6. Click Save and restart nodemanager.
Starting OHS (Oracle HTTP Server) backend applications without port number
After installing OHS on Weblogic server, by default OHS will listen on 7777 or 7778 port. Default configuration can be changed to port 80 and this configuration will eliminate port number from application URL.
For eg: I have OHS in front of content server and Content Server url would be ' http://127.0.0.1:7777/cs/ '. After below steps, Content Server application can be accessed by ' http://127.0.0.1/cs/ '
Follow below steps to change default listen port to 80.
1. Open EM console and navigate to HTTP Server --> <System Component>

2. Click on 'Ports Configuration' menu item.

3. Get lock & edit session.

4. Select HTTP protocol row and click on 'edit' button.

5.Change port value from 7777 to 80 and click 'Ok' button.

6. Click on lock and edit menu and activate changes.
7. Restart system component instances from top restart button.
"System failure occurred. Contact your site administrator." error message after WCC domain configuration.
WCC Version: 12.2.1.3.0
OS : Windows 10
Error Message: System failure occurred. Contact your site administrator.

Check whether WCC server is up and running, if not start WCC server instance. If WCC server is running, please follow below steps.
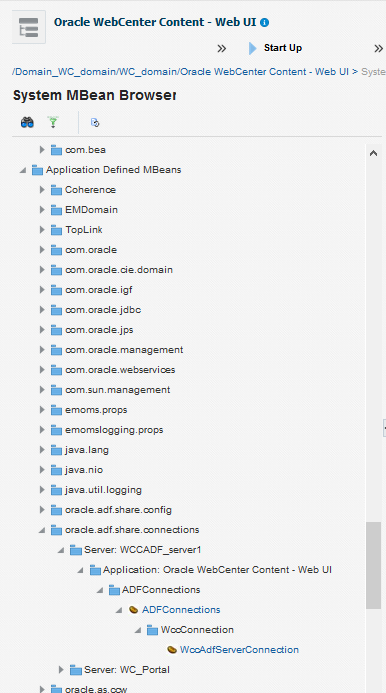
1. Open EM console and navigate to Application Deployments --> Oracle WebCenter Content - Web UI
2. Right click and select 'System MBean Browser'.
3. Search 'WccAdfServerConnection' Mbean name in search area (Make sure that WCC UI server instance is up and running).
For eg:
Application Defined MBeans --> oracle.adf.share.connections --> Server: WCCADF_server1 --> Application: Oracle WebCenter Content - Web UI --> ADFConnections --> WccConnection

4. Update below attribute values.
PropConnectionUrl : idc://localhost:4444
PropCredentialUsername : weblogic
PropCredentialPassword : <Password>
5. Click on ADFConnections (Parent node) --> Operations --> Save.

6. Click on right top invoke button.
7. Restart WCC UI server instance.
Try here to update WCC UI connection details using weblogic scripting commands.
Unable to reserve the .lok file for Integrated WebLogic Server (IntegratedWebLogicServer).
You might have noticed below error message from Jdeveloper after closing unexpectedly. You can follow below steps to recover your integrated server from this situation.
Error Message: Unable to reserve the .lok file for Integrated WebLogic Server (IntegratedWebLogicServer).
Jdeveloper Version: 12.2.1.3
1. Close Jdeveloper
2. Open Task Manager and stop java from process list.
3. Delete below files from your default WLS domain location.
<Install Location>\DefaultDomain\tmp\DefaultServer.lok
<Install Location>\DefaultDomain\edit.lok
4. Open Jdeveloper and start WLS.
Unable to un-deploy shared library from Integrated Weblogic server.
Problem:
Un-deployment of ADF shared library fails with below exception from WebLogic server.
WLS Version: 12.2.1.3
Error: weblogic.management.ManagementException: [Deployer:149001] [Version=1.1]” <YOUR LIBRARY NAME> exists for operation “undeploy”
Solution:
1. Stop all the servers, Admin & Managed servers
2. Go to the <MW_HOME>\user_projects\domains\<DOMAIN_NAME>\config
For eg, my location would be C:\xxxxxxxxxx\system\system12.2.1.3.42.170820.0914\DefaultDomain\config
3. Open the file config.xml (Back up the file)
4. Find your library by name , For example: dmskins
5. Delete the library element in the file. From <library> to </library>
6. Delete the jar file as mentioned in the <Source-Path>
For eg, my location would be C:\xxxxxxxxx\system\system12.2.1.3.42.170820.0914\DefaultDomain\servers\DefaultServer\upload\dmSkins\1.1@\app\
7. Restart the Admin and other servers
config.xml
  <library>
   <name>dmskins#1.1@</name>
   <target>DefaultServer</target>
   <module-type>war</module-type>
   <source-path>servers\DefaultServer\upload\dmSkins\1.1@\app\warDmSkins.war</source-path>
   <security-dd-model>DDOnly</security-dd-model>
   <staging-mode xsi:nil="true"></staging-mode>
   <plan-staging-mode xsi:nil="true"></plan-staging-mode>
   <cache-in-app-directory>false</cache-in-app-directory>
  </library>
Change /faces from ADF application url
There is an easy way to identify ADF production applications from the URL pattern. Most of the ADF applications are using the default configuration for JSF request and response processing and it generates /faces url pattern in application url .
There is an easy way to customize ADF application URL from web.xml file. Below configuration shows the default configuration.
<servlet-mapping>
<servlet-name>Faces Servlet</servlet-name>
<url-pattern><b>/faces/*</b></url-pattern>
</servlet-mapping>
And application URL would be http://127.0.0.1:7101/contextpath/faces/Home
Change /faces to your custom name. For eg, I am using /adffaces in my web.xml .
<servlet-mapping>
<servlet-name>Faces Servlet</servlet-name>
<url-pattern>/adffaces/*</url-pattern>
</servlet-mapping>
ADF application URL would be http://127.0.0.1:7101/contextpath/adffaces/Home
Subscribe to:
Posts (Atom)